
Copyright 2011. figNoggle Designs.
7x10, 7x12, 7x14 Mini-Lathe Information
Website Links
Post a link to your website or view other hobby and machine and metalworking websites for free.
|
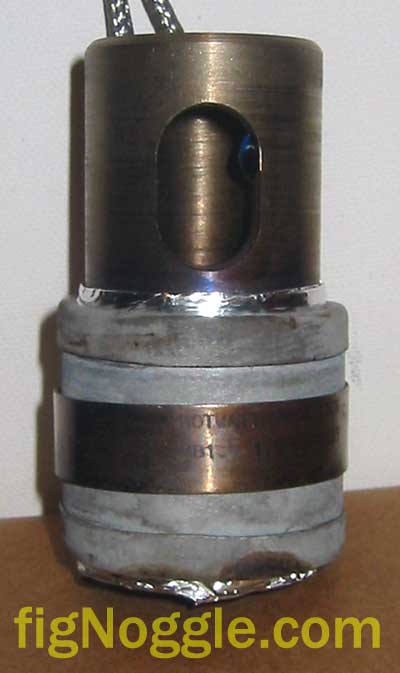
Rent Mill & Lathe DVDs at Smartflix | Great aluminum & steel prices at OnlineMetals PROTOTYPE BENCHTOP PLASTIC INJECTION MOLDING MACHINE This is the first prototype of the injection molding machine built using the mini-mill and mini-lathe. Simple design. In this page, we show the core plasticizing barrel and injection piston for driving the plasticized material through the 1/4" nozzle. We start with high density polyethelene. Before we continue, let's discuss the various types of commonly found household plastics which may or may not be suitable for material. You find the type of material by looking under the bottom of the plastic container and locating the triangle with the number in it. Number 1 are polyethylene plastics. Description: Clear plastics. May be gray, blue or white but they are clear (like water, soda bottles, kethcup containers and medicine containers) and you can actually see through them. Number 2 plastics are high-density polyethylene (HDPE). Description: Milk jug or water jug. They often have an opaque "soft" quality about them. Liquid laundry soap containers, bleach containers, shampoo bottles and motor oil bottles are also typically number 2. Number 3 plastics are poly vinyl chloride (PVC). Description: Pipes (like plastic plumbing pipes found in Home Depot in white or black), shower curtains and shrink wrap. Number 4 plastics are low-density polyethylene. Description: Plastic grocery bags and sandwich bags are common examples. Number 5 plastics are polypropylene (PE). Description: Yogurt containers and other food storage containers, and outdoor carpet. The material is very slick and is commonly used in food preparation items. Number 6 plastics are polystyrene plastics. Description: Disposable flatware, plastic cups, and bakery containers. These are more brittle in nature than the other plastics which are more pliable. Number 7 plastics include all other kinds of plastics. Description: Usually made from blending different kinds of plastics and are usually difficult to recycle. In a prettier format:
Now, in looking at the chip container we had laying around, it shows that it's a number 2 - HDPE.
It also shows that some of the material is also a number 7 - a mixture of plastics. The outside of the container is blue while the inner liner is black. Since this is all we had to test with and was more suitable than plastic drinking bottles of number 1, this was the test material. After heating up the "HotWatt" brand 275watt heating band (110v) for a few minutes, we inserted the cut up little "chips" into the barrel and let it heat up thereby plasticizing. According to the spec sheet, the unit we're using has a rating of 39 watts/sq.inch which yields an operating temperature (max) of close to 300°F. With a 1.5" diameter band of roughly 1.5" in height yields the following equation to determine the theoretical actual emitted temperature: [dia * 3.14 * width * watts/sq.in.] = 1.5 * 3.14 *1.5 * 40 = 282.6°F. Thus, according to the chart above, this heating element (assuming that it transmits this to the inside of the barrel) would be more than sufficient to plasticize the HDPE.
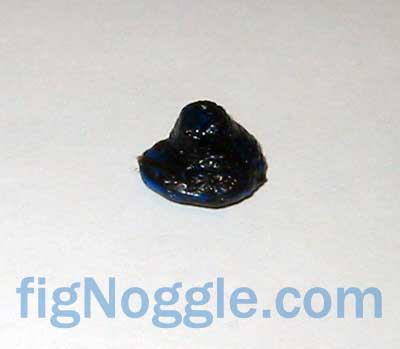
Then we inserted the piston and pushed. At this point, we're just testing the barrel and piston, so even with handheld force pushing the piston, the HDPE oozed out OK. There's much work ahead of us yet in order to determine the flowrates and temperatures required to document reliable performance. Many benchtop models unfortunately do not provide this and leave a lot of "figuring out" for their customers. We don't think this makes for a good customer experience.. Onto the end result. There's no injection mold being used at this time. What we ended up with is a lump of HDPE of blue and black color. What this tells us in part due to the color difference in materials is how they're mixing and melting together.
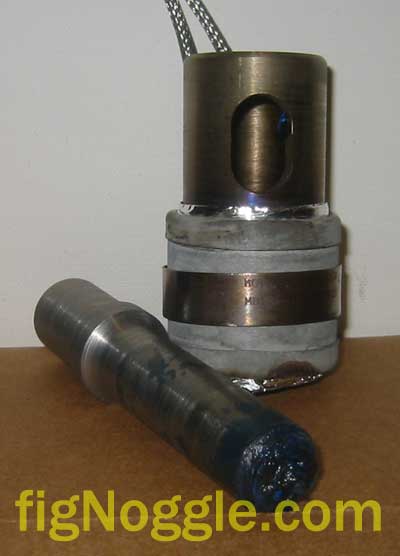
Now we can investigate how the plastics have melted by also looking at their residual "stick" on the key parts of the soon-to-be injection molding assembly:
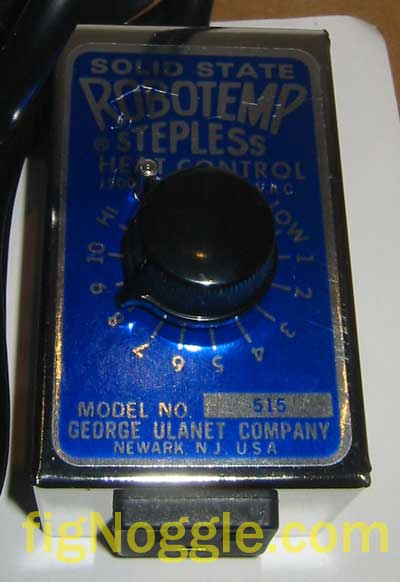
Notice that up to this point, we haven't dictated the temperature of the heating band with the use of a variable controller of some sort. One simple method of controlling temperature is to adjust the wattage. We use a simple product from the George Ulanet Company in Newark, NJ called the Robotemp (Model 515). It's a 1500 Watt max 115V stepless heating control. It uses a solid state triac circuitry to adjust wattage to the heating band thereby adjust the temperature. Clearly, this is not an accurate means of controlling temps given that we haven't included the use of some means of measuring the temperature even in the simplest form of an oven thermometer. We're planning on using a thermocouple that has the sensing unit embedded into the barrel of the injection molding unit. Using a close-looped system, the thermocouple reads the temerature and adjusts the yet-to-be-determined temperature controller. This will allow for more reliable temperature control. To "purge" the system, we used a stick of hot glue (for hot glue guns) and squeezed it through. With its low melting point and fairly high elasticity, we were able to quite simply clean the HDPE from the barrel nozzle. Here's the pic of the "Robotemp" temperature control unit:
All you do is plug the heating band element plug into the box, wait 10 minutes for the box to adjust and the make the appropriate "temperature" settings. Stay tuned... |

Looking for mini-mill help and how-tos? How about lathe help and how-tos?
We're prototyping a benchtop CNC vertical mill using the DigiSpeed-XL interface card for Mach, Dart Controls and KB Electronics KBIC/KBMM 90VDC motor controllers, 1.5HP treadmill motor from Surplus Center and a R8-spindle head from the X2 mini-mill - not to mention Gecko servo drives and an entirely closed-loop system. Come take a look!CNC 8x12 Lathe
Check out our newest developments like the CNC/DRO 8x12/8x14 lathe using Gecko drives, break-out board, NEMA 34 step motors, DRO and more!
SUPERX3.COM
Sieg X3 and Super X3 Grizzly G0463 Info
MDAHacks.com
T-Mobile MDA / Cingular 8125 / HTC Wizard Hacks, Tweaks, Tips, Tricks and More!
Metal Working FAQ.NET
Your source for metalworking and machining, tips, tricks, and more. Over 50 content wiki sites!