
Copyright 2011. figNoggle Designs.
7x10, 7x12, 7x14 Mini-Lathe Information
Website Links
Post a link to your website or view other hobby and machine and metalworking websites for free.
|
Rent Mill & Lathe DVDs at Smartflix | Great aluminum & steel prices at OnlineMetals Round Column Mill Drill Tramming How-To
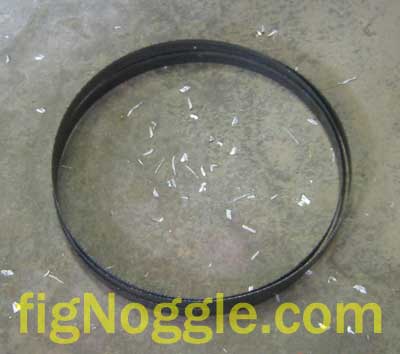
If you thought tramming the mini-mill was laborious, try tramming the round-column mill drill. The main problem with the design (which also makes it affordable) is the round column's mounting method. It's basically the round column mounted to its base plate secured to the base with four bolts. The problem is that there is no independent X/Y articulation as you have with even the mini-mills or large knee/turret-style mills. You'll still need to follow basic tramming procedures. Just note that once one axis has been trammed, in order to do the other axis, all four bolts need to be re-loosened thereby re-introducing error to the previously trammed axis. Before we get started, here's a quick tip! If you have the metal banding strap that came with your equipment, save them as they can be used for shimming purposes. You'll also want to have some steel shim stock of say, 0.001" thickness to work on fine adjustments. Also, if you have that old bandsaw blade with broken teeth, save it - these can be used for shimstock as well:
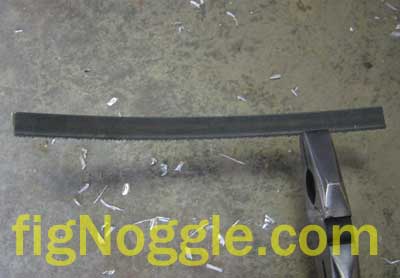
This is a 0.025" thickness blade with broken teeth. Just take a pair of linesman electrician pliers and use it to wiggle the blade a few times. It should break cleanly and easily. Next, you'll want to remove the teeth by nipping away at them using the same pliers:
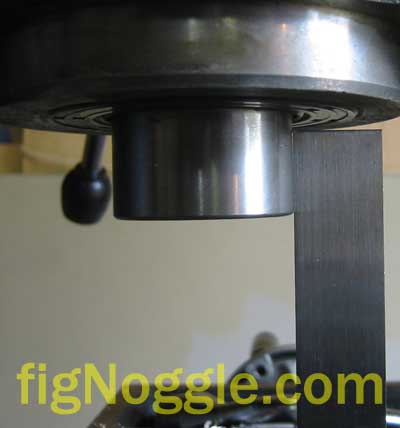
Now on to the tramming procedure. The fastest, cheapest, and "get it done" or "good enough for government work" method of tramming involves your machinist square. Since many brands, including the cheap asian imports have tolerances of few fractions of degrees or better on squareness, you can use them to effectively tram your round column. All that's required is that you take your square, set it on top of the clean table and push it against the quill in both the X and Y directions. Here's what you'll see if your mill is our of tram in the Y-axis. Note that the square has been set up facing the Y-axis from the front. The gap at the top indicates that the column needs to be tilited forward (towards the front of the table/operator). To do this, you'll need to loosen slightly the two forward bolts and loosen more still the back two bolts. Tilt the column forward, stick a shim in there, tighten the four bolts and check for gaps. Repeat this procedure until you've trammed it in this axis. The X-axis uses the same procedure. We didnt' take pictures of what and out-of-tram mill cuts like, but rest-assured, they're not pretty.
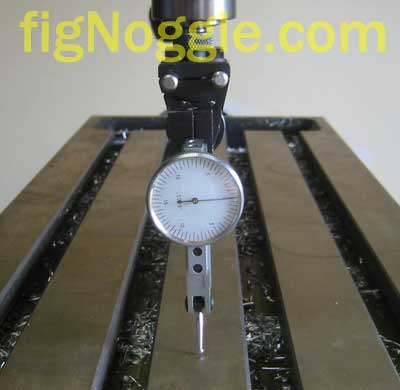
Now, we'll use a more accurate method of tramming which takes some patience. You'll need to first have on hand either a dial test indicator (DTI) with fine graduations of .0005" or better (like .0001" - btw, this is probably not necessary given the overall precision of your equipment) or a plunger-style indicator with like resolutions. Here, we have a Mitutoyo "zero-test" test indicator holder with an import DTI with a 0.0005" resolution (i.e. 0.0005" per mark on the face):
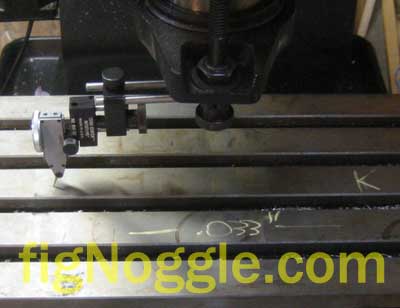
This holder has a shank of stepped diameters - 0.25", 0.375", 0.50" which makes chucking into a collet easier given the options available. The DTI simply slides into the dovetail holder portion of the holder. One thing to watch out for is that if your mill is way out of tram (like ours was), then using this style of indicator with only a total travel of something like 0.030" may not be enough. You may need to start with the square method or use a plunger-style indicator first to get out most of the error. Let's start with the X-axis first. We'll need to note the 9AM and 3PM positons on the table as best we can:
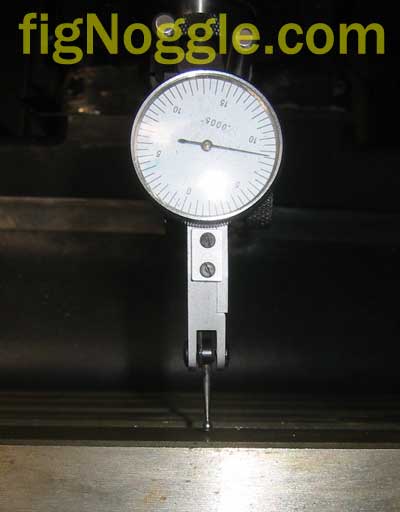
As you can see by the chalk note, we're out of tram by 0.033" across a span of 8" of so. Not good (and we gave away the punchline already!). We'll want to set the 9AM position to zero on the DTI. Make sure to "pluck" the indicator and lightly tap the holder to get out any preload. Turn the dial face to zero. Repeat until zero is indeed zero. Now, hold the plunger or indicator feeler up from the table as you swing the assembly to the 3PM position. Let the feeler come in contact with the table and note the amount of travel by the count of clicks/graduations. This is the amount you're off. Be sure to also "pluck" and lightly tap as we've described to get out any preload. Also note the travel of the indicator arm. The clockwise or counterclockwise rotation means you're either up or down. Be sure to get this right or you'll tram the wrong direction! Here's a close-up of the 9AM:
Now that we know the difference, we'll shim the column base as described in the square-method and swing the DTI around again to check. Repeat this until you get the desired tram accuracy. We "lived" with 0.001" across the 8" swing. That means that for most of the smaller workpieces, we can hold tolerances of +/-0.001" if we make sure we everything else is tight. For the Y-axis, you'll want to follow the same procedure. Here's a tip! Start with your Y-axis since you won't need to adjust the swing of your indicator holder for hte X-axis. The picture below just shows that there's a huge gap between the feeler and table. Nothing too special otherwise.
When you've shimmed, it'll look something like this:
To avoid cutting yourself or others as they move their fingers in this area with the exposed 0.001" thick shimstock, use a utility knife to score and remove the excess. That's all there is to it. Lots of patience will yield results that'll make you and your customers happy! We trammed the Dayton/Grainger 2AC40 Rong-fu 31 (RF-31) round column mill in this article. Find out how to remove the spindle.
Stay tuned...
|


Looking for mini-mill help and how-tos? How about lathe help and how-tos?
We're prototyping a benchtop CNC vertical mill using the DigiSpeed-XL interface card for Mach, Dart Controls and KB Electronics KBIC/KBMM 90VDC motor controllers, 1.5HP treadmill motor from Surplus Center and a R8-spindle head from the X2 mini-mill - not to mention Gecko servo drives and an entirely closed-loop system. Come take a look!CNC 8x12 Lathe
Check out our newest developments like the CNC/DRO 8x12/8x14 lathe using Gecko drives, break-out board, NEMA 34 step motors, DRO and more!
SUPERX3.COM
Sieg X3 and Super X3 Grizzly G0463 Info
MDAHacks.com
T-Mobile MDA / Cingular 8125 / HTC Wizard Hacks, Tweaks, Tips, Tricks and More!
Metal Working FAQ.NET
Your source for metalworking and machining, tips, tricks, and more. Over 50 content wiki sites!