(275,’2007-03-10 21:46:05′,’david’,’2007-03-13 07:45:19′,’david’,’Cast Iron Bed Mounted – X and Y Axes Almost Completed’,”,’We’ve been working on the home-brewed CNC vertical mill lately. The latest development was the installation of the cast iron T-slot table.
While not the ideal table width, the depth of just over 6″ makes it heftier than the X2 mini-mill base (though not as wide). Eventhough the base isn’t as wide as the mini-mill’s, with the travel this mill has, makes that dimension only important in that we can’t clamp the workpiece to the table should it reach a size of 6″ x 12″.
We’re pretty happy with many Phase 2 products such as their line of QCTPs for the mini-lathe, but their X/Y table is just about the worst quality piece of tooling we’ve ever purchased. It took only a quick glance at the table to realize that sacrificing the table wouldn’t cause any heartburn.
As an FYI, the part number is 260-512PHSII “Compound Slide Mill and Drill Table” (ENCO part number 201-2826 often on sale for $70). From the moment we took delivery of this table, one of gib set screws broke as we tried to tighten it. The backlash on the leadscrews is the worst we’ve ever experienced. The bottom line is that the only salvagable part is the cast iron table.

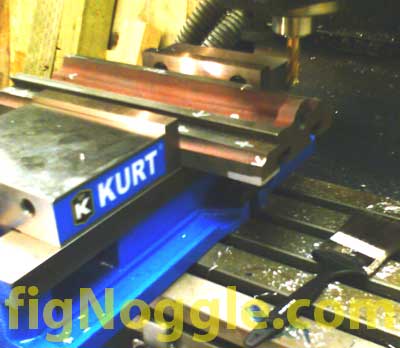
The first thing we had to do was to recess the holes in the aluminum base plate so that the cast iron table could sit flush on it. Since we now have a Kurt D675 vise that has a jaw opening of over 7″ and a RF-31 clone mill/drill with 7″ Y travel, we felt confident that we could not only chuck the base plate in the vise, but also with the extended work envelope of the mill/drill, could easily in one pass perform the 1/2″ diameter 4-flute end mill recesses to accept the button head socket screws. Unfortunately, the Kurt D675 has a rather large base which prevented us from doing so..

As you can see from the above picture, the end of the base hits the column of the mill just at around 5″ of travel. This vise is better suited for a full-sized knee mill (or the home-brewed mill we’re working on ![]() ).
).
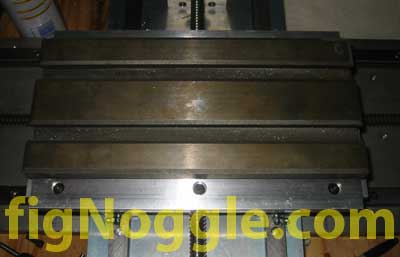
Next up, we had to drill and tap a series of holes on the underside of the cast iron table, mill away at the support for the leadscrew, and drill and tap holes in the offset spacer rails that sit between the bottom of the table way and the aluminum base plate:
Even without a DRO, the .001″ increment hand dials made keeping track of positioning much easier than with the .0125″ increments found with many Asian mini machinery.
Here we begin assembling the base plate to the linear bearing blocks:
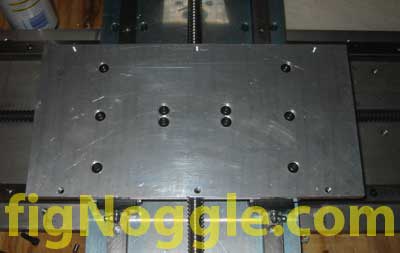
Then we mount the spacer rails to the table and then the base plate:
Now onto the Z-axis column…
Or, start from the beginning.’,’
We’ve been working on the home-brewed CNC vertical mill lately. The latest development was the installation of the cast iron T-slot table.
While not the ideal table width, the depth of just over 6” makes it heftier than the X2 mini-mill base (though not as wide). Eventhough the base isn’t as wide as the mini-mill’s, with the travel this mill has, makes that dimension only important in that we can’t clamp the workpiece to the table should it reach a size of 6” x 12”.
We’re pretty happy with many Phase 2 products such as their line of QCTPs for the mini-lathe, but their X/Y table is just about the worst quality piece of tooling we’ve ever purchased. It took only a quick glance at the table to realize that sacrificing the table wouldn’t cause any heartburn.
As an FYI, the part number is 260-512PHSII “Compound Slide Mill and Drill Table” (ENCO part number 201-2826 often on sale for $70). From the moment we took delivery of this table, one of gib set screws broke as we tried to tighten it. The backlash on the leadscrews is the worst we’ve ever experienced. The bottom line is that the only salvagable part is the cast iron table.
The first thing we had to do was to recess the holes in the aluminum base plate so that the cast iron table could sit flush on it. Since we now have a Kurt D675 vise that has a jaw opening of over 7” and a RF-31 clone mill/drill with 7” Y travel, we felt confident that we could not only chuck the base plate in the vise, but also with the extended work envelope of the mill/drill, could easily in one pass perform the 1/2” diameter 4-flute end mill recesses to accept the button head socket screws. Unfortunately, the Kurt D675 has a rather large base which prevented us from doing so..
As you can see from the above picture, the end of the base hits the column of the mill just at around 5” of travel. This vise is better suited for a full-sized knee mill (or the home-brewed mill we’re working on ![]() ).
).
Next up, we had to drill and tap a series of holes on the underside of the cast iron table, mill away at the support for the leadscrew, and drill and tap holes in the offset spacer rails that sit between the bottom of the table way and the aluminum base plate:
Even without a DRO, the .001” increment hand dials made keeping track of positioning much easier than with the .0125” increments found with many Asian mini machinery.
Here we begin assembling the base plate to the linear bearing blocks:
Then we mount the spacer rails to the table and then the base plate:
Now onto the Z-axis column…
‘,’We’ve been working on the home-brewed CNC vertical mill lately. The latest development was the installation of the cast iron T-slot table.
While not the ideal table width, the depth of just over 6″ makes it heftier than the X2 mini-mill base (though not as wide). Eventhough the base isn’t as wide as the mini-mill’s, with the travel this mill has, makes that dimension only important in that we can’t clamp the workpiece to the table should it reach a size of 6″ x 12″.
We’re pretty happy with many Phase 2 products such as their line of QCTPs for the mini-lathe, but their X/Y table is just about the worst quality piece of tooling we’ve ever purchased. It took only a quick glance at the table to realize that sacrificing the table wouldn’t cause any heartburn.
As an FYI, the part number is 260-512PHSII “Compound Slide Mill and Drill Table” (ENCO part number 201-2826 often on sale for $70). From the moment we took delivery of this table, one of gib set screws broke as we tried to tighten it. The backlash on the leadscrews is the worst we’ve ever experienced. The bottom line is that the only salvagable part is the cast iron table.
\r\n’,’
We’ve been working on the home-brewed CNC vertical mill lately. The latest development was the installation of the cast iron T-slot table.
While not the ideal table width, the depth of just over 6” makes it heftier than the X2 mini-mill base (though not as wide). Eventhough the base isn’t as wide as the mini-mill’s, with the travel this mill has, makes that dimension only important in that we can’t clamp the workpiece to the table should it reach a size of 6” x 12”.
We’re pretty happy with many Phase 2 products such as their line of QCTPs for the mini-lathe, but their X/Y table is just about the worst quality piece of tooling we’ve ever purchased. It took only a quick glance at the table to realize that sacrificing the table wouldn’t cause any heartburn.
As an FYI, the part number is 260-512PHSII “Compound Slide Mill and Drill Table” (ENCO part number 201-2826 often on sale for $70). From the moment we took delivery of this table, one of gib set screws broke as we tried to tighten it. The backlash on the leadscrews is the worst we’ve ever experienced. The bottom line is that the only salvagable part is the cast iron table.
‘,”,’Home-Brewed-CNC-Vertical-Mill’,”,1,’Comment’,0,4,1,1,’article’,”,”,’cast-iron-bed-mounted-x-and-y-axes-almost-completed’,”,”,”,”,”,”,”,”,”,”,’f0a6bb1b90e1df1d3738bed871a8266b’,’2007-03-10′);