(256,’2006-10-25 12:00:00′,’figNoggle’,’2006-12-26 00:24:55′,’david’,’Setting Up Two Precision Screwless Vises Side-By-Side On The Mini-Mill Table’,”,’There are two frustrations that arise from using just one 3″ wide precision screwless vise: 1. with 6″ long parallels, you’ll find that they like to fall off the vise when you loosen the jaws and 2. milling, facing, or drilling longer workpieces sometimes creates problems if the workpiece extends too far out from the vise (facing yields poor results and drilling can sometimes push the workpiece down and tilt the piece or just cause undesired deflection).
What’s the solution? The real way would be to get a 6″ version of the same vise since something like the Kurt D-675 or like vises can’t be used effectively on the small mini-mill table. Since we haven’t been able to locate a wider version of the vise we currently use, it forced an alternate solution – buy another one of the 3″ variety (from ENCO – click here for ENCO free shipping coupons) and put it next to the other one.

First thing’s first – just because you buy the same SKU doesn’t mean they are dimensionally identical! guess how we found out? 

Turned out that the newer model has narrower clamp channels and is .020″ higher on the base (eventhough the jaws are shorter).
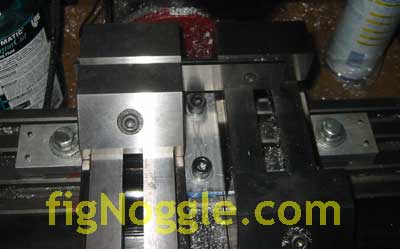
We first had to make a middle clamp that would clamp down the facing channels of the two vises. We opted to use two bolts instead of one to add extra measures against moment-turning. Once it was made, we layed it out with the two vises. The important step here is to make sure you have enough clearance for the largest diameter tool with the vise to which you zero. For example, we always use the bottom right corner of the fixed jaw as our origin, so from there, we moved the table to its max such that a 2.5″ diameter face mill can clear it. (We’ll get a picture here sometime to illustrate this better). We set them side by side for a layout before the clamp-down and then mark the table for a general location marker.

Back to the dimension issue.. Since there was a .001″ shim stock roll laying around, we folded it up 20 times to create the right thickness and started mounting that vise first. We chose to square up the shorter one first. Either way is fine. After using our quick method of squaring up a vise in addition to using an indicator, we clamped down the first vise using just one side first. Then we inserted the middle clamp and then the other vise. Before tightening this one down, a tip is to chuck a pair of parallels into the first vise and use the fixed jaw of the second vise to make it in parallel alignment with the first. Then tighten down the second vise on the other side and you’re done!
No more parallels falling off and you’ve not only increased clamping width but also allowed for multiple part machining! Cool!’
‘,’
There are two frustrations that arise from using just one 3” wide precision screwless vise: 1. with 6” long parallels, you’ll find that they like to fall off the vise when you loosen the jaws and 2. milling, facing, or drilling longer workpieces sometimes creates problems if the workpiece extends too far out from the vise (facing yields poor results and drilling can sometimes push the workpiece down and tilt the piece or just cause undesired deflection).
What’s the solution? The real way would be to get a 6” version of the same vise since something like the Kurt D-675 or like vises can’t be used effectively on the small mini-mill table. Since we haven’t been able to locate a wider version of the vise we currently use, it forced an alternate solution – buy another one of the 3” variety (from ENCO – click here for ENCO free shipping coupons) and put it next to the other one.
First thing’s first – just because you buy the same SKU doesn’t mean they are dimensionally identical! guess how we found out?
Turned out that the newer model has narrower clamp channels and is .020” higher on the base (eventhough the jaws are shorter).
We first had to make a middle clamp that would clamp down the facing channels of the two vises. We opted to use two bolts instead of one to add extra measures against moment-turning. Once it was made, we layed it out with the two vises. The important step here is to make sure you have enough clearance for the largest diameter tool with the vise to which you zero. For example, we always use the bottom right corner of the fixed jaw as our origin, so from there, we moved the table to its max such that a 2.5” diameter face mill can clear it. (We’ll get a picture here sometime to illustrate this better). We set them side by side for a layout before the clamp-down and then mark the table for a general location marker.
Back to the dimension issue.. Since there was a .001” shim stock roll laying around, we folded it up 20 times to create the right thickness and started mounting that vise first. We chose to square up the shorter one first. Either way is fine. After using our quick method of squaring up a vise in addition to using an indicator, we clamped down the first vise using just one side first. Then we inserted the middle clamp and then the other vise. Before tightening this one down, a tip is to chuck a pair of parallels into the first vise and use the fixed jaw of the second vise to make it in parallel alignment with the first. Then tighten down the second vise on the other side and you’re done!
No more parallels falling off and you’ve not only increased clamping width but also allowed for multiple part machining! Cool!’
‘,’There are two frustrations that arise from using just one 3″ wide precision screwless vise: 1. with 6″ long parallels, you’ll find that they like to fall off the vise when you loosen the jaws and 2. milling, facing, or drilling longer workpieces sometimes creates problems if the workpiece extends too far out from the vise (facing yields poor results and drilling can sometimes push the workpiece down and tilt the piece or just cause undesired deflection).
What’s the solution? The real way would be to get a 6″ version of the same vise since something like the Kurt D-675 or like vises can’t be used effectively on the small mini-mill table. Since we haven’t been able to locate a wider version of the vise we currently use, it forced an alternate solution – buy another one of the 3″ variety (from ENCO – click here for ENCO free shipping coupons) and put it next to the other one.
‘,’
There are two frustrations that arise from using just one 3” wide precision screwless vise: 1. with 6” long parallels, you’ll find that they like to fall off the vise when you loosen the jaws and 2. milling, facing, or drilling longer workpieces sometimes creates problems if the workpiece extends too far out from the vise (facing yields poor results and drilling can sometimes push the workpiece down and tilt the piece or just cause undesired deflection).
What’s the solution? The real way would be to get a 6” version of the same vise since something like the Kurt D-675 or like vises can’t be used effectively on the small mini-mill table. Since we haven’t been able to locate a wider version of the vise we currently use, it forced an alternate solution – buy another one of the 3” variety (from ENCO – click here for ENCO free shipping coupons) and put it next to the other one.
‘,”,’Sieg-X2-Mini-Mill’,”,0,”,0,4,1,1,’article’,”,”,’setting-up-two-precision-screwless-vises-side-by-side-on-the-mini-mill-table’,”,”,”,”,”,”,”,”,”,”,’f6ca3ff06ff30fde1372f6394ceaf042′,’2006-10-25′);
 ‘
‘