
Copyright 2011. figNoggle Designs.
7x10, 7x12, 7x14 Mini-Lathe Information
Website Links
Post a link to your website or view other hobby and machine and metalworking websites for free.
|
Rent Mill & Lathe DVDs at Smartflix | Great aluminum & steel prices at OnlineMetals
12x24, 12x36, 13x40 LATHES
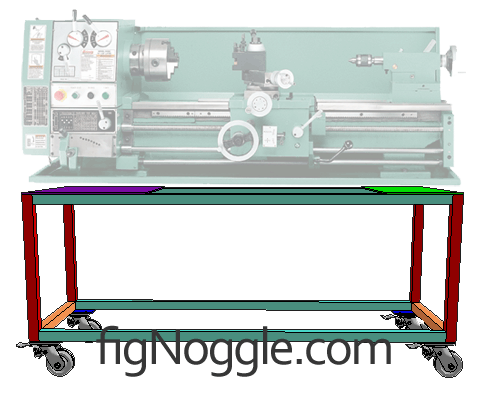
12x36 Lathes How-Tos - Rolling Stand Build a rolling stand using 1.5" square tubing and some metal plate.
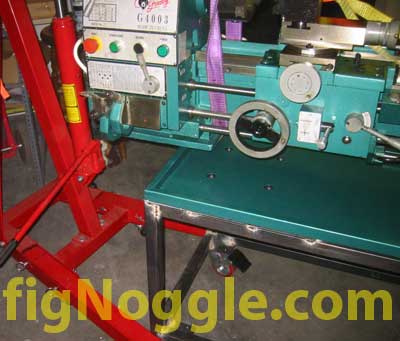
We wanted to have a stand that would let us roll around the shop floor. With a weight of around 900 pounds, we were wary of doing such a thing, but it's nice to have the flexibility. So, as we did with other smaller machinery, we put it on a stand. You can download the plans for free here. It was made entirely with 0.072" wall thickness 1.5" square tubing, which costs around $35 per 20 foot length. We needed two lengths to complete the job. While structurally, it holds fine, for piece of mind, some may want to use a larger tube cross section (say 2") or and/or even beef up the wall thickness. We had thought about using 4" angle, but it's considerably more expensive, given today's high demand for steel and prices that accompany that demand. The only real structural element to the stand was that we added 3/16" plate that sits atop the frame to distribute the headstock and tailstock weight onto the frame, instead of having the welds of the three cross-braces be the "weak link". This way, should the welds fail, the plate should still happily sit on the frame. We used Faultless brand casters model # 1438 TB with the polyurethane-coated solid cast iron casters with "total lock". The total lock system lets you lock the caster itself from spinning as well as the caster assembly from rotating. It's as close as you're going to get to setting it on jackstands. Given this configuration, leveling the lathe is pretty much out of the question, since the moment it's rolled around the shop, some twist may develop. Since we do most work close to the headstock, that's not much of a concern. The finaly design consideration was for stability and interoperability with the engine hoist. Originally, we wanted to have a deeper stand, but decided 24" was deep enough. This just so happens to be slightly over optimal if you intend to fully wrap the legs of the engine hoist around the stand. Still, we were able to make due as you'll soon see. The parts are simple enough. Some tubing and casters. And a welder. We even milled the pieces on the mill to ensure tight fits:
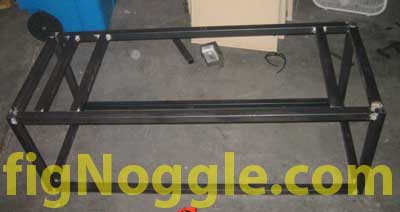
After some welding with our little Campbell Hausfeld 110v welder, we came up with the following:
Note the three cross beams on the top. These are spaced directly under the mounting holes in the lathe base.
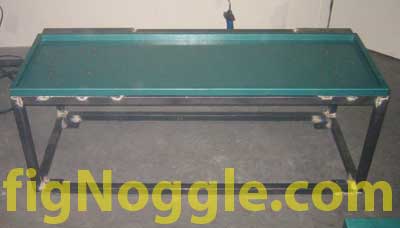
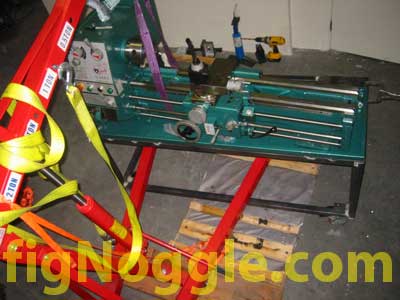
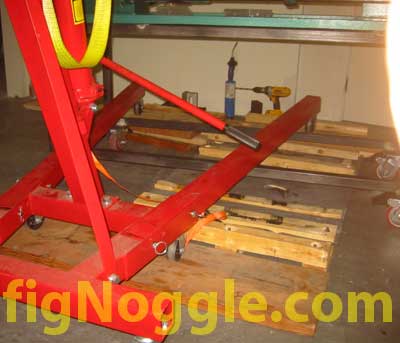
After the 3/16" plates are welded on top of the frame, we put the chip pan on top to make out the holes to be drilled. Note that the chip pan front sits atop the front of the frame. This was intentional. This, of course, leaves a gap in the back of the stand. No one will see that once the splash guard is installed on the lathe. Now the fun part begins! Once the holes are drilled, we put the chip pan on and secured it with clamps and vise grips so that it won't move around under the weight of the sloshing lathe. Two straps are required for the move. We used the purple 1-ton strap sold by Harbor Freight as the main weight carrier. It wraps around under the base next to the chuck. We removed the tailstock, steady and follower rests. The second strap is one of those racheting types for holding down stuff. This one acts to level the lathe once it's up in the air.
Again, watch out for the gear change levers and the leg of your engine hoist! To be on the safe side, after raising your lathe up a bit, stick some wood underneath (even spanning the legs) just in case the lathe drops. This would reduce the amount of falling distance and prevent (hopefully) the breaking of those gear levers.
Here we are raising the lathe in mid air and holding our collective breaths (note that one person can actually perform all of the operations mentioned in this article).
And another shot from the other side. We're getting ready to move it to the stand. We first move the headstock end on the cart:
You can see here from the picture that the stand doesn't quite get underneath the bulk of the headstock end of the lathe. This is due to the depth of the stand and the width of the engine hoist legs. At this point, we just rest the lathe on the stand in this manner. There's enough counterweight from the rest of the lathe (remember high school physics?). If you're overly concerned, you can tie a rope around the lathe on the tailstock end and the stand and even add some additional weight on that end. Next, we move the engine hoist to the other end of the cart, re-strap the lathe, and lift:
Doing this "pulls" the lathe a bit towards the tailstock end, just enough to set the entire lathe on the stand. That's basically all there is to it! However, if you find that you need to make additional adjustments, take some blocking/plywood/etc. and rest it on the floor under ALL the wheels of the engine hoist such that the legs sit over (and clear) the bottom frame of the cart. This lets you lift the lathe using its center of gravity. You could (we would have as well from the beginning) devised such a platform system for our setup since all our stands roll around on 4" casters, which happens to be in the way of the engine hoist legs.
We didn't have enough wood on hand, so we had to jury-rig some 2x4, 2x8, and make use of the bottom of the crate to raise the engine hoist enough to perform one last lift.
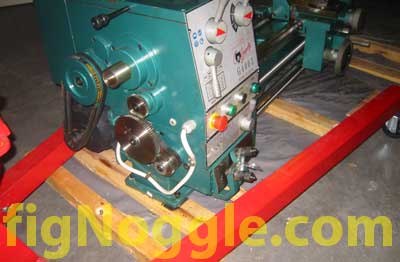
And that's that! With 6 3/8"16 (3 1/2" long) bolts, we secured the lathe to the stand and rolled it into its place. Now it's time to have some fun making chips! |


Looking for mini-mill help and how-tos? How about lathe help and how-tos?
We're prototyping a benchtop CNC vertical mill using the DigiSpeed-XL interface card for Mach, Dart Controls and KB Electronics KBIC/KBMM 90VDC motor controllers, 1.5HP treadmill motor from Surplus Center and a R8-spindle head from the X2 mini-mill - not to mention Gecko servo drives and an entirely closed-loop system. Come take a look!CNC 8x12 Lathe
Check out our newest developments like the CNC/DRO 8x12/8x14 lathe using Gecko drives, break-out board, NEMA 34 step motors, DRO and more!
SUPERX3.COM
Sieg X3 and Super X3 Grizzly G0463 Info
MDAHacks.com
T-Mobile MDA / Cingular 8125 / HTC Wizard Hacks, Tweaks, Tips, Tricks and More!
Metal Working FAQ.NET
Your source for metalworking and machining, tips, tricks, and more. Over 50 content wiki sites!