Copyright 2011. figNoggle Designs.
7x10, 7x12, 7x14 Mini-Lathe Information Website Links
Post a link to your website or view other hobby and machine and metalworking websites for free.
|
|
Rent Mill & Lathe DVDs at Smartflix | Great aluminum & steel prices at OnlineMetals
8x12/8x14 LATHE
- 8x12 HOME
- FIRST LOOK
- SECOND LOOK
- SPECS
- PRICING
- HOW-TOS
- STUFFMADE
- LINKS
- CNC
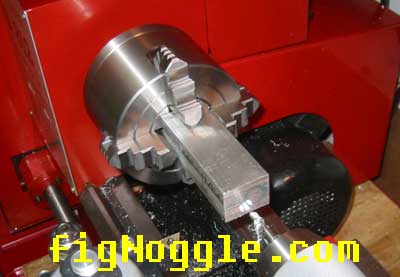
HOW-TO Remove And Replace The Stock
Chuck
There aren't a lot of publicly verified
accessories for the 8x12/8x14 lathe.
One of the things you may want is to also use a
independent 4-jaw chuck for square and odd-shaped workpieces.
This how-to shows you how to replace the
stock chuck and replace it with a 4-jaw chuck.
| the allen wrench that came with the machine is
obviously too long to get at the back of the chuck plate.
there are three M8x1 socket head cap screws.
we'll need to shorten the length of the wrench by
~1/2". use either a bench grinder or a bandsaw.
debur edges when completed. |
 |
| the wrench should look like this.
note: keep the part you cut off. you can use this
later. |
 |
| TURN OFF THE POWER!
BETTER YET, UNPLUG THE LATHE BEFORE CONTINUING!!
there's no spindle lock, so, put the wrench in the
back of one of the screws and with the chuck wrench in one of the
keyholes, grab both and squeeze.
this should loosen the screws. |
 |
| start loosening all the screws.
you can use the little cut-off bit to wrench and
hand-loosen.
it's a good idea to place a rag on the bed so that
if the chuck drops, it's won't nick the bed. |
 |
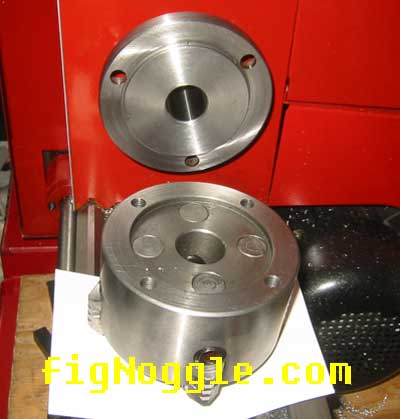
| here's the chuck removed.
note that there are three mounting holes.
here are the important dimensions:
- 72mm = diameter of the inner relief
- 84mm = diameter of the bolt hole pattern
- 3.5mm = depth of the relief
|
 |
| while attempting to locate a suitable chuck (not easy
and still looking!), there was a shars-brand independent 4-jaw chuck that
was purchased for the 7x min-lathe (and of course, it didn't fit on that
one).
if memory serves, the shars part
number is 202-5419 (but it was actually purchased on their ebay website).
tip! shars has a website that has advertised
specials that are sometimes cheaper than what they list on ebay. |
 |
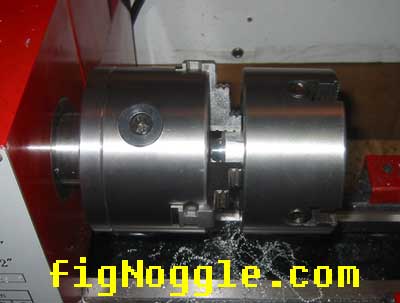
| here's the back sides in comparison.
note that the 4-jaw has as 4-bolt pattern.
so the option is the drill and counterbore holes
in the spindle chuck backing plate (not easy to do and requires some major
disassembly of the lathe) or drill and tap three holes in the back of the
chuck.
since we know the diameter of the bolt-pattern and
luckily have a lathe with a 6" rotary table, we can do this. |
 |
| while the chuck is off, we chucked the MT3 spindle
taper dead center and the MT2 tailstock dead center to check out any major
visual alignment problems.
looks good to the eye (we never tested run-out
since we unboxed the lathe and put it to some heavy use). this is the
first time! |
 |
| here is the 4-jaw chuck on the backing plate. it
fits.
apparently, it was meant for this. |
 |
| here's a better shot of the mismatching bolt holes. |
 |
| a round stock of 1" diameter was turned down to act as a mounting jig
fixture so that the 4-jaw chuck can be inserted into the MT2 taper of the
rotary table.
this is a test fit. |
 |
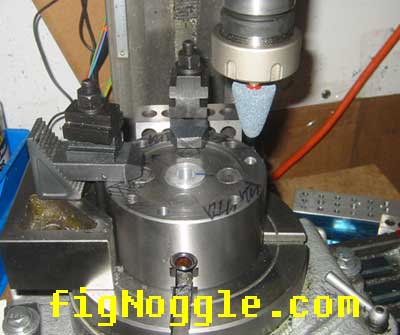
| here the chuck is tested for runout while on the
rotary table.
according to the dti, it's at
.004" total.
this is acceptable since the chuck's centering
primarily depends on the relief shown above.
we first performed a "spin test" to see if runout
would be severe. looks good. |
click here for video |
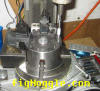
| this setup took some thinking and mounting before
starting.
the final decision was to use one
of the existing holes and just drill and tap the remaining two at 120
degrees apart from each other.
holes were drilled no more than 0.750" deep so as
to avoid any interference with the wormscrew mechanisms inside. there was
no way to avoid holes being outside a "safe" zone of the worm gears.
holes were drilled using an "H" bit. it's off spec
by 0.0017". but it will just mean more thread contact. |
 |
| here the holes are being tapped with an M8x1.25 tap. |
 |
| holes should really be countersunk before tapping, so
a grinder was chucked in the mill to grind it down a bit instead of using
a countersink. |
 |
| mounted! |
 |
| finally non-cylindrical workpieces can be turned.
total machine time was under 30 minutes.
as usual most of the time was spent setting things
up. using the rotary table centering jig really helped a lot. |
 |
|
|

Looking for mini-mill help and how-tos? How about lathe help and how-tos? We're prototyping a benchtop CNC vertical mill using the DigiSpeed-XL interface card for Mach, Dart Controls and KB Electronics KBIC/KBMM 90VDC motor controllers, 1.5HP treadmill motor from Surplus Center and a R8-spindle head from the X2 mini-mill - not to mention Gecko servo drives and an entirely closed-loop system. Come take a look!CNC 8x12 Lathe
Check out our newest developments like the CNC/DRO 8x12/8x14 lathe using Gecko drives, break-out board, NEMA 34 step motors, DRO and more!
SUPERX3.COM
Sieg X3 and Super X3 Grizzly G0463 Info MDAHacks.com
T-Mobile MDA / Cingular 8125 / HTC Wizard Hacks, Tweaks, Tips, Tricks and More!
Metal Working FAQ.NET
Your source for metalworking and machining, tips, tricks, and more. Over 50 content wiki sites!
|